We know your time is valuable, which is why Enfonica has built an intelligent software layer that allows businesses to provision voice and SMS-enabled phone numbers in minutes. Whether it be by clicking or by code, Enfonica provides you immediate access to local, mobile, 1300 and 1800 phone numbers for your voice and SMS applications.
Here we will show you how to set up Australian phone numbers using either our API or the Enfonica Console. The choice is yours.
Purchasing phone numbers with the Enfonica Console
Once you’ve logged into the Enfonica Console, choose the project you want to purchase a number for and select Phone Numbers from the left menu. Here you’ll be able to manage your current inventory or purchase additional numbers.
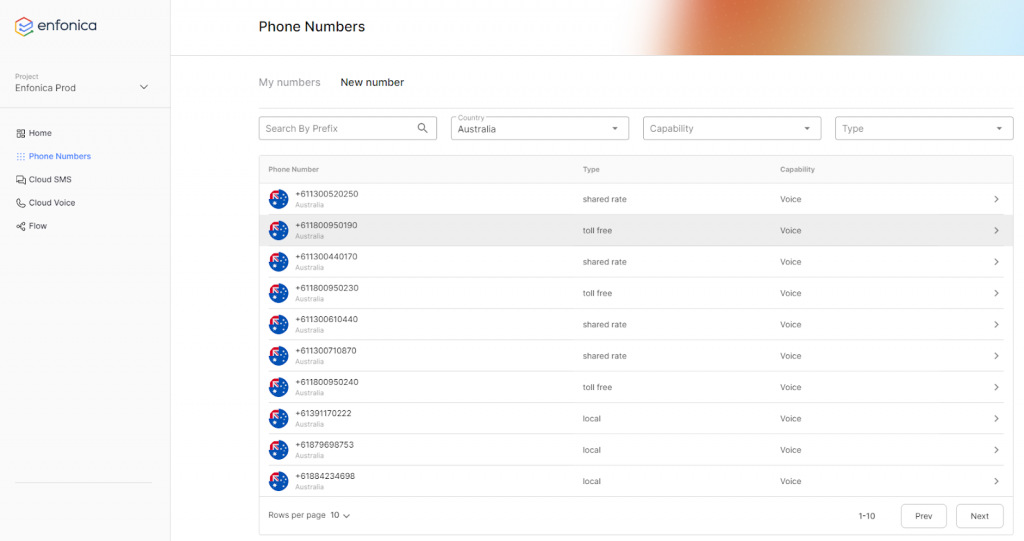
Under the Purchase tab, you can filter your search by country, capability or type, and search for numbers by their prefix. Once you have selected a number, click purchase and you’re done. It’s as simple as that! Your new phone number will appear in your phone numbers list in the project you purchased it in.
Purchasing phone numbers with the Enfonica API with C#
Alternative to using the Enfonica Console, you also have the ability to search and purchase phone numbers using our API. If you can develop for the web, you can develop for telco.
First things first, you’ll need to get everything ready. To use the Enfonica API, you will need:
- Your access token (a bearer token)
- Your project name (e.g. projects/my-project)
To install the Enfonica Client Library for .NET, simply install the Enfonica package from NuGet.
To use the library, you will need your service account key. For more information on authentication in Enfonica’s platform for application developers, please see our Docs.
Search available phone numbers
The search phone numbers API allows you to filter search results based on the type of phone number. A description of all available fields is available in the public interface definitions.
var client = PhoneNumbersClient.Create();

// search for australian mobile numbers
var results = client.SearchPhoneNumbersAsync(new()
{
    CountryCode = "AU",
    Prefix = "+614"
});

// display all results (using auto-magic pagination)
await foreach (var number in results)
{
    Console.WriteLine(number.PhoneNumber_);
}
Purchase a phone number
When you’re ready to purchase a phone number, you’ll need to create an “instance” of it against your given project.
var phoneNumbersClient = PhoneNumbersClient.Create();
var phoneNumberInstancesClient = PhoneNumberInstancesClient.Create();

// get the first AU mobile phone number result
var results = phoneNumbersClient.SearchPhoneNumbersAsync(new()
{
    CountryCode = "AU",
    Prefix = "+614"
});
var firstMobile = (await results.ReadPageAsync(1)).First();

// provision
var provisioned = await phoneNumberInstancesClient.CreatePhoneNumberInstanceAsync(new()
{
    Parent = "projects/my-project",
    PhoneNumberInstance = new()
    {
        PhoneNumber = new()
        {
            Name = firstMobile.Name
        }
    }
});
Console.WriteLine($"Provisioned phone number instance {provisioned.Name}");
Configure the purchased phone number
Once you have purchased a phone number, you can update the “phone number instance” using the API. This will allow you to configure how a call or SMS will be handled.
In this example, we’ll forward all calls to a mobile number.
var phoneNumberInstancesClient = PhoneNumberInstancesClient.Create();

// define the changes we want to make
var changes = new PhoneNumberInstance();
changes.IncomingCallHandlerUris.Add("tel:+61412345678");

// apply the changes to the specified phone number instance
// change `Name` below to match the name of your phone number instance
await phoneNumberInstancesClient.UpdatePhoneNumberInstanceAsync(new()
{
    Name = "projects/my-project/phoneNumberInstances/7sdynf8sydfym7sdnf87ny7dfy8sydf87ysd",
    PhoneNumberInstance = changes
});
There you have it! You’ve searched, purchased and set up a new phone number with code.
Closing words
By following this guide, you’ve been able to set up a phone number in the Enfonica Console and using the Enfonica API.
Setting up phone numbers shouldn’t be difficult, which is why we’ve worked our hardest to make the process quick and easy.


